Building a backyard ice rink takes patience, but I’ve done it with basic tools and honestly, it’s pretty doable. You’ll need a level spot, some 4×6 lumber for borders, PVC pipes, and a heavy-duty liner. The real trick is flooding thin layers—about a quarter inch at a time—and letting each one freeze solid before adding the next. I won’t lie, it takes weeks, but stick with it through the cold nights and you’ll have a skating surface that’ll blow your mind. Stick around and I’ll show you exactly how.
Choose the Right Spot for Your Backyard Ice Rink

Where should you actually put this thing? I’ve learned the hard way that location makes or breaks your rink. Hunt for a level area—seriously, even slight slopes’ll mess with your ice thickness. I once picked a spot that looked flat and ended up with a skating disaster on one end.
You’ll want a flat surface near a winter water source, maybe a hose or outdoor spigot. Shade helps too. Direct sun’s your enemy, constantly melting edges.
Scan for sharp rocks and roots hiding in grass. I’d suggest starting around 20×40 feet—plenty for skating without overwhelming yourself. Make sure you’ve got room for borders and edging without water running toward your house or landscaping.
Accessibility matters. Can you easily reach it for flooding and evening supervision?
What You’ll Need to Build a DIY Ice Rink

Now that you’ve got your perfect spot picked out, it’s time to gather your materials—and I’ve got good news: you don’t need to break the bank.
For a basic backyard ice rink, you’ll need 36 feet of 4-inch PVC sewer pipe (ten-foot lengths work great), four PVC corners, and a 100-count sheet of 6-mil polyethylene liner. That’s roughly $300 total. I know that sounds like a lot, but honestly, it’s cheaper than season passes.
The DIY materials are straightforward. The PVC frame forms your rink’s skeleton, while the liner holds your water. You’ll also grab PVC caps to secure everything in place. That’s it. No fancy equipment needed. Start simple, and you’ll have neighbors asking how you pulled this off.
Prepare Your Backyard Ice Rink Foundation

Before you flood anything, I’ve learned the hard way that picking the right spot—flat, shaded, close to water—saves you from major headaches later. You’ll want to grab a level or string line to check your ground’s grade, then clear away rocks and debris that’ll puncture your liner faster than you’d think. Finally, I’d set up your border system with wood beams or boards, secure those corners with brackets, and fill in any low spots so your ice freezes evenly instead of creating weak spots that’ll drive you nuts all winter.
Site Selection and Leveling
Have you ever noticed how your neighbor’s ice rink looks perfectly smooth while yours turns into a lopsided skating disaster?
I learned this lesson the hard way. The secret isn’t magic—it’s picking the right spot and leveling it properly. I now scout my yard like I’m searching for buried treasure, looking for that flat area that’ll make my life easier.
Here’s what I focus on:
- Finding level ground free of rocks and sharp debris
- Choosing a spot with some shade for consistent freezing
- Clearing away branches and obstacles before liner placement
- Starting with a 20×40 foot space for manageable maintenance
- Snow packing the perimeter to create sturdy borders
When I skip these steps, my rink suffers. When I’m intentional? Pure skating bliss awaits.
Ground Clearing and Preparation
When I finally got serious about ground prep, my rink stopped looking like a skating rink designed by someone with no sense of balance. I cleared away a foot of snow to expose the ground beneath—this took me about two hours, honestly longer than I’d expected. I picked out every sharp rock and stick I could find, making the spot completely debris-free. That’s when I realized drainage matters enormously; I sloped the ground slightly so water wouldn’t pool in unwanted places. I checked for a nearby water source for convenient flooding later. Using adjustable supports under my frame compensated for stubborn uneven spots. Taking time here meant my rink actually stayed level all winter. Trust me, skipping this step just creates headaches later.
Border and Perimeter Setup
Now that your ground’s prepped and level, it’s time to build the walls that’ll actually hold all that water. I’ll be honest—my first attempt wobbled like jelly, so sturdy construction matters big time.
Here’s what you’ll need:
- 12-foot 4×6 beams or railroad ties for your border frame
- Corner brackets to lock those corners tight against water pressure
- A heavy-duty liner (larger than your frame) to seal everything
- Staples or fasteners to secure the liner to the outer perimeter
- A level check along the inner edge for gaps or bumps
Your 35×50-foot rink needs that perimeter rock-solid. I learned the hard way that cutting corners here means leaks later. Secure those brackets firmly, stretch your liner carefully, and you’ll create a watertight seal ready for flooding.
Build Your Ice Rink Border and Frame

I’ll be honest—getting your border level is probably the most annoying part, but it’s worth the effort because a crooked rink won’t drain right and your ice won’t freeze evenly. I use PVC sewer pipe sections (those 10-footers snap together with simple cuts) and four corners to build my rectangular frame, then I grab some bricks and a level to make sure everything sits perfectly flat, checking that my diagonal measurements match so I’ve got a true rectangle. Once that frame is solid and level, I stretch the liner inside, fill it with water, and use PVC caps to keep the liner pulled at least 2 feet away from the corners—this is the step where patience actually saves you from ripping that expensive liner.
Choosing Your Border Materials
What’s holding up your ice rink—literally? Your border materials. I’ll be honest—I didn’t think this part mattered much until my first attempt nearly collapsed. The right framing makes all the difference.
You’ve got solid options here:
- 6×4 inch wood beams fastened with Iron Sleek Corner Brackets for durability
- Large-diameter PVC pipes shaped into a sturdy frame that holds water and ice
- Railroad ties if you’re working with what you’ve got
- Plywood walls as a budget-friendly backup plan
- Ice Rink Extension Brackets for handling tricky slopes
I recommend wood beams with two steel brackets per corner. Space them four feet apart—trust me on this. Then unfold your liner inside, making sure it’s bigger than your rink’s inner area. Staple it to the outer border. Done right, you’ll have a level, leak-free surface that’ll last the whole season.
Securing Level Foundations
Start by leveling your ground ahead of time. Use cinder blocks or bricks to support your rink border and adjust for minor slopes. Check that all corners are equal and your diagonals match perfectly—this ensures a proper rectangle.
This prep work prevents liner tears and guarantees even water distribution. Trust me, spending an afternoon with a level tool beats dealing with a damaged shoreline later. Your future self will thank you when that rink border stays perfectly positioned and your foundation keeps everything stable all season.
Cut and Assemble Your PVC Frame

The frame’s the skeleton of your whole rink, so getting this part right’ll save you headaches later—trust me, I’ve learned that the hard way. You’ll need to cut 18 PVC pipes carefully using a table saw. Here’s what makes this step crucial:
- Cut 36 total slots (2.5–3 inches each) across all pipes for proper snapping
- Clamp pipes during cutting to prevent spinning and ensure straight cuts
- File and sand every raw edge to protect your liner from tears
- Assemble corners so they’re perfectly square by checking equal diagonals
- Cap pipe ends at least 2 feet from corners to secure the liner during flooding
Take your time with the cutting and assembly. A square frame means your rink’ll actually work.
Install the Liner and Secure the Edges

How do you keep water from pooling everywhere and your liner from becoming Swiss cheese? I’ll be honest—I’ve learned this the hard way. Start by unfolding your liner so it extends about 4 feet beyond your frame on all sides. This overhang’s crucial for accommodating settling during flooding.
Next, I staple the liner to the top outer edge of my perimeter boards, securing it firmly to prevent leaks. At the corners, clip or fasten the edges carefully to avoid tearing where the frame meets. I’ve added caps and brackets for extra pressure distribution.
When flooding, I go slow. A few inches of water first, then thin layers, freezing each before adding the next. Trust me, patience here saves headaches later.
Apply Your First Water Layer

Once your liner’s locked down tight, you’re ready to bring your rink to life with water—and this part’s where patience becomes your best friend. I learned this the hard way by dumping too much water at once and ending up with a lumpy mess.
Your first coat sets everything up for success. Here’s what I do:
- Spray gently with a brass nozzle to keep water from pooling
- Apply only a thin layer—think barely wet, not soaked
- Wait for complete freeze time before adding more
- Check temperatures daily; if freezing takes forever, use less water next time
- Build up gradually, layer by layer, for an even ice base
This first coat creates your foundation. Rushing it means uneven spots later. Trust me, slow and steady wins this race.
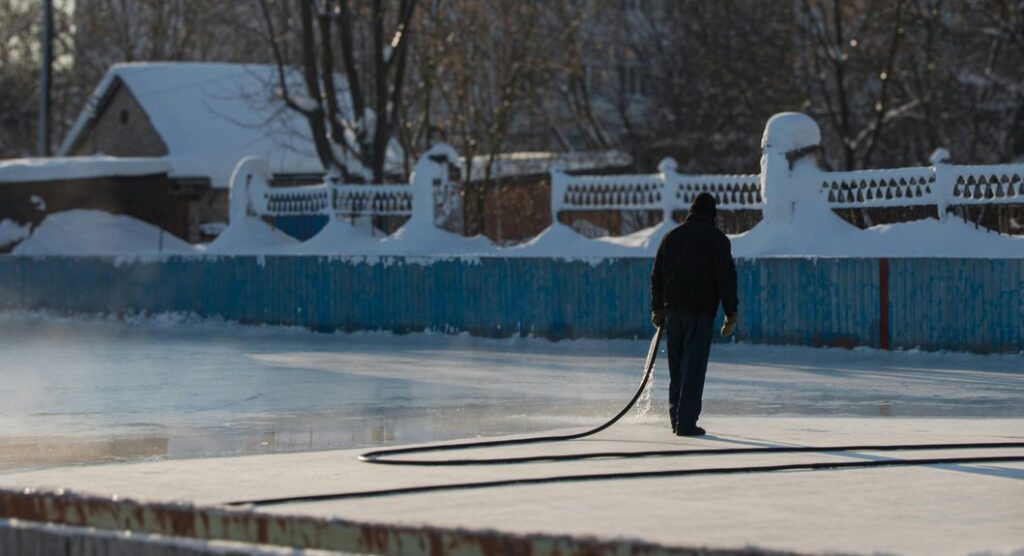
Build Ice With Daily Flooding Cycles

Now’s where the real magic happens—you’ll flood your rink in thin layers, about 1/4 inch each time, letting each one freeze solid before you add the next. I’ve learned the hard way that timing matters; I flood early in the morning when temps are stable and below freezing, and I watch that layer like a hawk because if it’s taking longer than 15–20 minutes to freeze, I dial back the water amount so it hardens faster and stays smooth. The key is patience and paying attention to your ground conditions, since you don’t want the base shifting underneath and creating those annoying lumpy spots that’ll trip you up later.
Optimal Freezing Conditions
When’s the best moment to start flooding your rink? I’ve learned that timing makes all the difference. You’ll want freezing temperatures to stick around, with nighttime lows hitting 25°F or below for at least five consecutive days. That’s when I know I’m ready to begin.
Here’s what I’ve discovered works:
- Flood at night or early morning when surfaces are coldest
- Apply thin, daily layers instead of dumping everything at once
- Wait 15–20 minutes between floods so each layer freezes solid
- Aim for 3–4 inches total ice thickness through gradual builds
- Keep layered flooding going as cold weather persists
I’ll admit, I’ve rushed this before and regretted it. Those overnight flooding sessions? They’re your secret weapon for smooth ice. Trust the process, and you’ll have something worth skating on.
Layered Water Application
How do you build ice that’s actually smooth instead of lumpy and full of cracks? Layered flooding is your answer, and honestly, it’s changed my rink game completely.
I’ve learned that thin layers work magic. Each pass should be about 1/4 inch thick—think of it like painting rather than drowning your rink. I flood at night when temperatures drop below freezing and let each layer freeze solid before adding the next one.
Here’s my trick: if a layer takes longer than 15–20 minutes to freeze, I reduce the water amount and flood more frequently. This prevents those annoying blisters and rough spots that’ll wreck your skating.
After several days of this freezing layers cycle, I check my ice thickness and smooth rough patches. Then I repeat. Building rink smoothness takes patience, but you’ll notice the difference immediately once you hit that perfectly smooth ice.
Smooth Your Ice After Every Skate

You’d be amazed how quickly a beautiful skating surface turns bumpy and rutted. I’ve learned that maintaining smooth ice requires effort after every skate session. Here’s what keeps my rink looking great:
- Flatten rough patches with a shovel or ice chipper immediately after skating
- Spray a fine layer of hot water for a sleeker surface
- Clear fresh snow promptly to prevent compaction and uneven freezing
- Re-flood lightly in thin layers (about 1/4 inch) to restore smoothness
- Allow each layer to freeze completely before adding the next
I’ll admit, I didn’t understand the importance of this routine initially. But once I started maintaining my ice consistently, the difference was incredible. Those few extra minutes of work transform your rink from rough and frustrating into something you’ll actually want to skate on. It’s worth the effort.
Repair Cracks, Bumps, and Thaws

Despite your best maintenance efforts, damage happens—and that’s totally normal. I’ve dealt with plenty of cracks and bumps on my backyard rink, so you’re not alone.
When chips appear after a thaw, I patch them with a water-snow slush mixture, then re-flood lightly to restore that smooth surface. For chunky ice, I avoid one heavy flood—that backfires. Instead, I smooth gradually using hot water or a scraper in stages.
Here’s my go-to approach: apply thin flooding layers, letting each freeze completely before adding the next. This gradually eliminates bumps without creating new problems.
If your liner tears, E6000 adhesive with Tyvek tape works great. Re-clip those top pipe edges too—it prevents further tearing that’ll haunt you all season. Regular maintenance and quick fixes keep your rink game strong.